
A porch is more than just an entryway. The issue described—a porch tilting toward the home—is a classic example of what happens when construction best practices are overlooked. This deficiency creates a negative slope, channeling rainwater directly back at the house, leading to accelerated wood rot on the front sill (rim joist), deck boards, and structural columns.
Proper construction prevents this by focusing on three core principles: stability, water management (drainage), and using the right materials.
Foundation First: Stability is Non-Negotiable
The foundation is the most critical element, as it bears the entire load of the porch and dictates its stability.
1. Footings and Posts
- Go Deep: Porch footings must extend below the local frost line to prevent shifting and heaving during freeze-thaw cycles. In many regions, this is non-negotiable for stability.
- Sizing: Footings should be sized appropriately for the load they support. They are typically concrete piers or precast blocks.
- Post-to-Footing Connection: Pressure-treated wood posts (e.g., 4″×4″ or 6″×6″) should be secured to the concrete footings using metal post anchors (stand-offs). This is crucial because it raises the end grain of the post above the concrete, preventing direct contact with pooled water and significantly inhibiting rot.
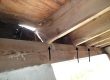
2. Ledger Board and Flashing
The connection point to the house is the most vulnerable area for water penetration and the cause of the tilting issue mentioned.
- The Ledger Board: This is the framing member bolted directly to the house’s rim joist or band sill. It must be attached with appropriate structural fasteners (e.g., hot-dipped galvanized or stainless steel lag screws/bolts), not just nails.
- The Tilt (Crucial for Drainage): The ledger board and subsequent framing should be set to create a slight positive slope (pitch) for the deck boards—typically 1/4 inch per foot—away from the house. This ensures water runs off the porch and onto the yard.
- Flashing: A continuous piece of metal or bituminous flashing must be installed over the ledger board and tucked up under the house’s exterior siding. This acts as a protective apron, directing any water that gets behind the deck boards over the ledger and away from the vulnerable rim joist/sill plate of the main home.
Framing for Longevity and Drainage
Once the foundation and ledger are secure, the remaining framework must prioritize strength and water resistance not only here in New Orleans but in my next stop Cleveland.
1. Pressure-Treated Lumber
All structural components—joists, beams, and posts—should be pressure-treated (PT) lumber rated for ground contact, even if they aren’t touching the ground. PT lumber is chemically treated to resist insects and fungal decay (rot).
2. Joist Spacing
Porch floor joists (the boards that support the deck boards) should be spaced to meet local building codes, usually 16 inches on center. This spacing provides adequate support for standard decking material and prevents a bouncy or unstable feeling underfoot.
3. Proper Fasteners
Use only hot-dipped galvanized, stainless steel, or ceramic-coated fasteners. Standard steel nails and screws will quickly corrode when used with pressure-treated lumber due to the chemicals, leading to rust stains and structural failure.
Decking and Rot Prevention
The choice of decking material and the way it’s installed directly impacts the long-term maintenance and rot potential.
1. Material Selection
- Composite/PVC Decking: A popular, low-maintenance choice that is highly resistant to moisture, insects, and fading. It’s often more expensive initially but saves time and money on staining and sealing.
- Hardwoods: Naturally rot-resistant woods like cedar, redwood, or tropical hardwoods (e.g., Ipe) are durable but require periodic oiling or sealing to maintain their appearance and prevent checking.
- Pressure-Treated Decking: The most economical option, but it requires annual or bi-annual sealing/staining to protect the surface and inhibit rot.
2. Airflow is Key
Moisture and lack of airflow are the primary causes of wood rot.
- Spacing: Deck boards must be installed with small gaps (typically 1/8 to 1/4 inch) between them. This allows water to drain and facilitates airflow for drying.
- Gaps from Structure: Ensure a slight gap is left between the deck boards and the house siding to prevent water from being trapped.
- Ventilation: If the porch is skirted, sufficient ventilation openings must be installed to allow air to circulate freely beneath the porch structure. Sunshine Inspection focuses on home inspections with ventilation and hence possible scientific issues with moisture.
Column and Railing Installation
Columns and railings require specialized attention to prevent moisture traps.
1. Column Bases
Never set wood columns directly on the deck boards or concrete. They should be supported by a column base or trim block that raises the bottom of the column a small distance (1/2 to 1 inch) above the decking. This prevents the column’s base from wicking up standing water—a common point for wood rot on the columns.
2. Railing Post Attachments
Railing posts should be securely fastened to the rim joists using post-to-deck structural connectors rather than simply bolting them to the deck surface. This creates a stronger connection and helps prevent the railing from becoming loose and wobbly over time.
The Takeaway for Homeowners
To avoid a costly porch failure and the associated wood rot on your home’s front sill, good home inspectors can find these issues.
- A Stable Foundation: Footings below the frost line with metal stand-offs.
- Positive Slope: A minimum 1/4 inch per foot pitch away from the house for drainage.
- Comprehensive Flashing: Metal flashing installed over the ledger board to protect the house connection.
- Airflow: Proper spacing between deck boards and adequate under-porch ventilation.
A correctly constructed porch will provide decades of beauty and function, keeping your home dry and structurally sound.